Do you want to build an internet enabled button? Something that when you press it does something else, like send you an email, an alert, buys something on Amazon. Well then go read this IFTTT Smart Button article and have fun. What you’re reading right now is a journal of discovery which ends up with an internet enabled button just like the one in that article, but there was way more blood, pain and suffering along the way.
There is a newer version of this project, check out version 2.
Project: A mailbox alert
My locking mailbox is down a steep driveway and it’s annoying to go down to it only to find the mail hasn’t been delivered yet. Because of Informed Delivery I even know if something important or interesting is coming. I’ve wanted to build some kind of way of alerting me when the mail’s been delivered. Sure, I could have bought something, there’s so many kooky and cool solutions out there from super low tech to fancy pants, but this seemed like an interesting project to play around with.
Learning ESP8266
A while back I bought a Pi Zero and was amazed at how cheap it was and thought this would be the basis for my project. I was going to run a super long wire down to the mailbox with a magnetic reed switch to notice when it opened and it was going to be neat. But then I had the idea of it connecting wirelessly, being battery powered and living in the mailbox so I started looking up running a Pi Zero on battery power and found that it wouldn’t run for very long but there was a thing called an ESP8266 that had wifi, very low power consumption and some I/O pins. There was a version that was impossibly cheap called ESP-01 at <$1.50 each, Perfect. I ordered one (actually a few), on Ali Express. From China. It’d take a month to arrive, that’s fine, I have plenty of time. Every now and again I would remember it and wonder when it’d arrive and eventually I thought, “did I even order it?” I couldn’t remember the model number and when I finally worked that out I couldn’t find anything in my email. I couldn’t even remember where I’d possibly ordered it from. After checking a few sites I logged into Ali Express, found I had ordered it and it’d just passed through customs and would finally be here. Yay.
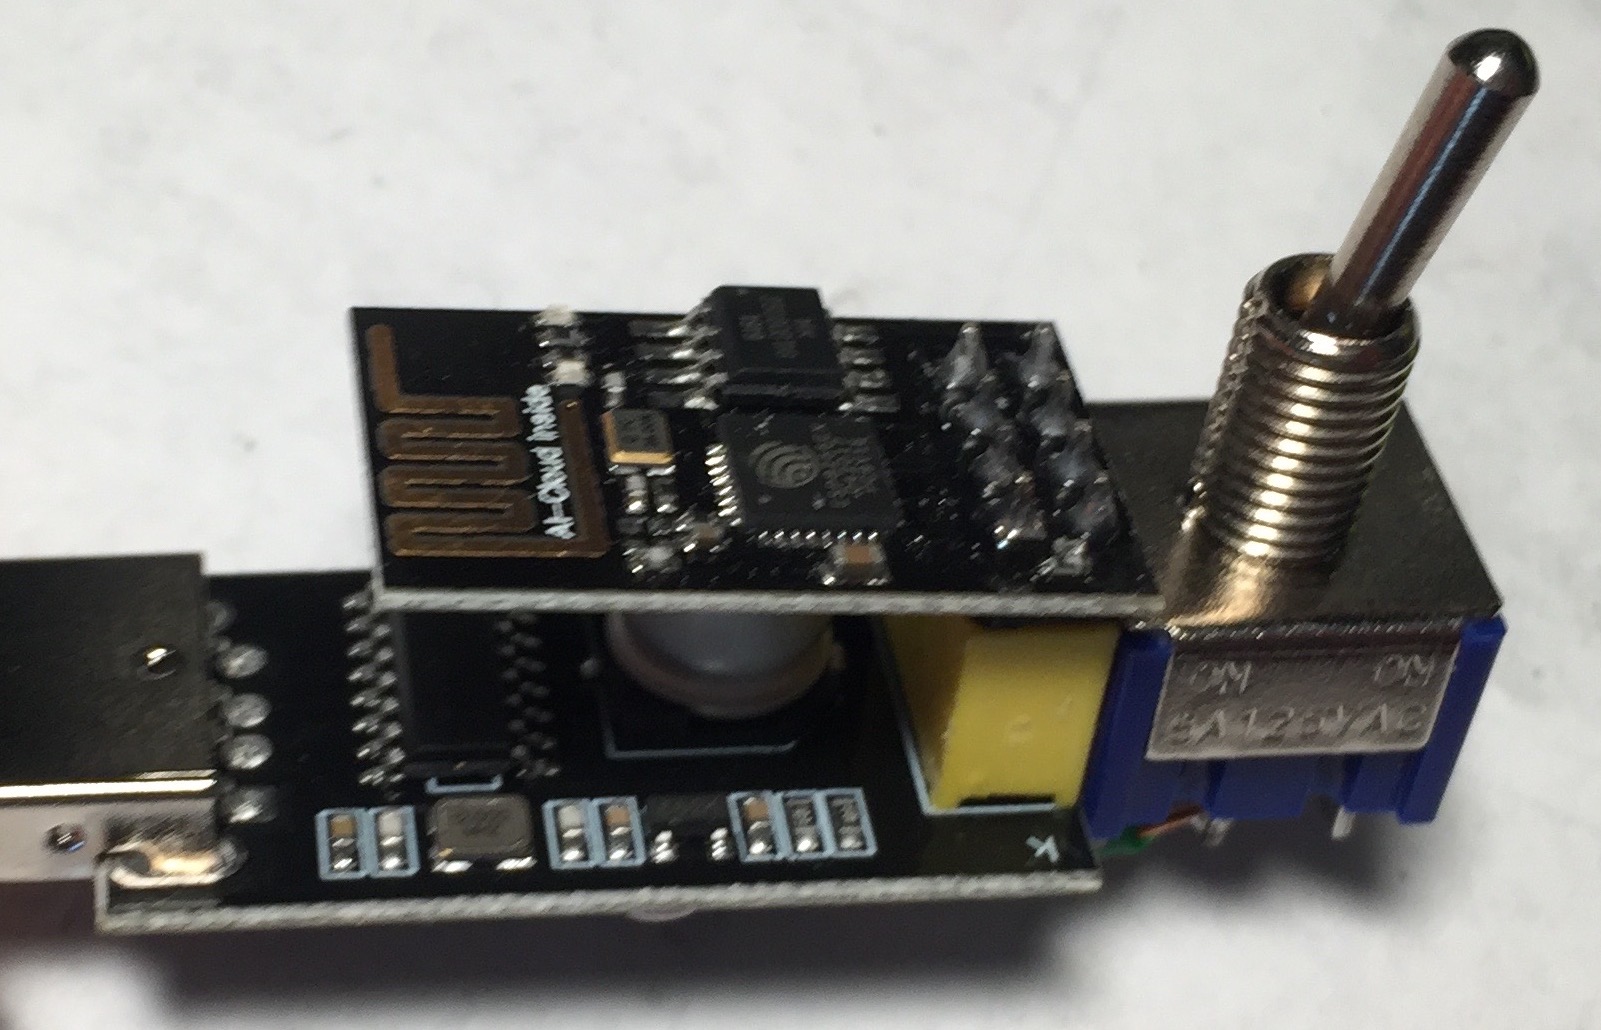
It arrived, looks impossibly tiny, butlooks like it’s going to work. Let’s get it up and running.
I found this ESP8266 beginner guide and started following the insctructions, now my usb serial port has a header that the ESP-01 fits into so I didn’t need any breadboard but I’d have to set some pins if I wanted to flash the firmware which I’m sure I’d like to do. But first I just talk to it over the serial port with the recommended CoolTerm.app and try some AT commands and sure enough it works, finds wifi spots and can even get an IP address and get some HTML. I am amazed. For just over $1 this is blowing my mind.
After talking to my expert IoT friend Dave, I also find out it has 1MB of flash memory, it’s more powerful than my first two computers combined.
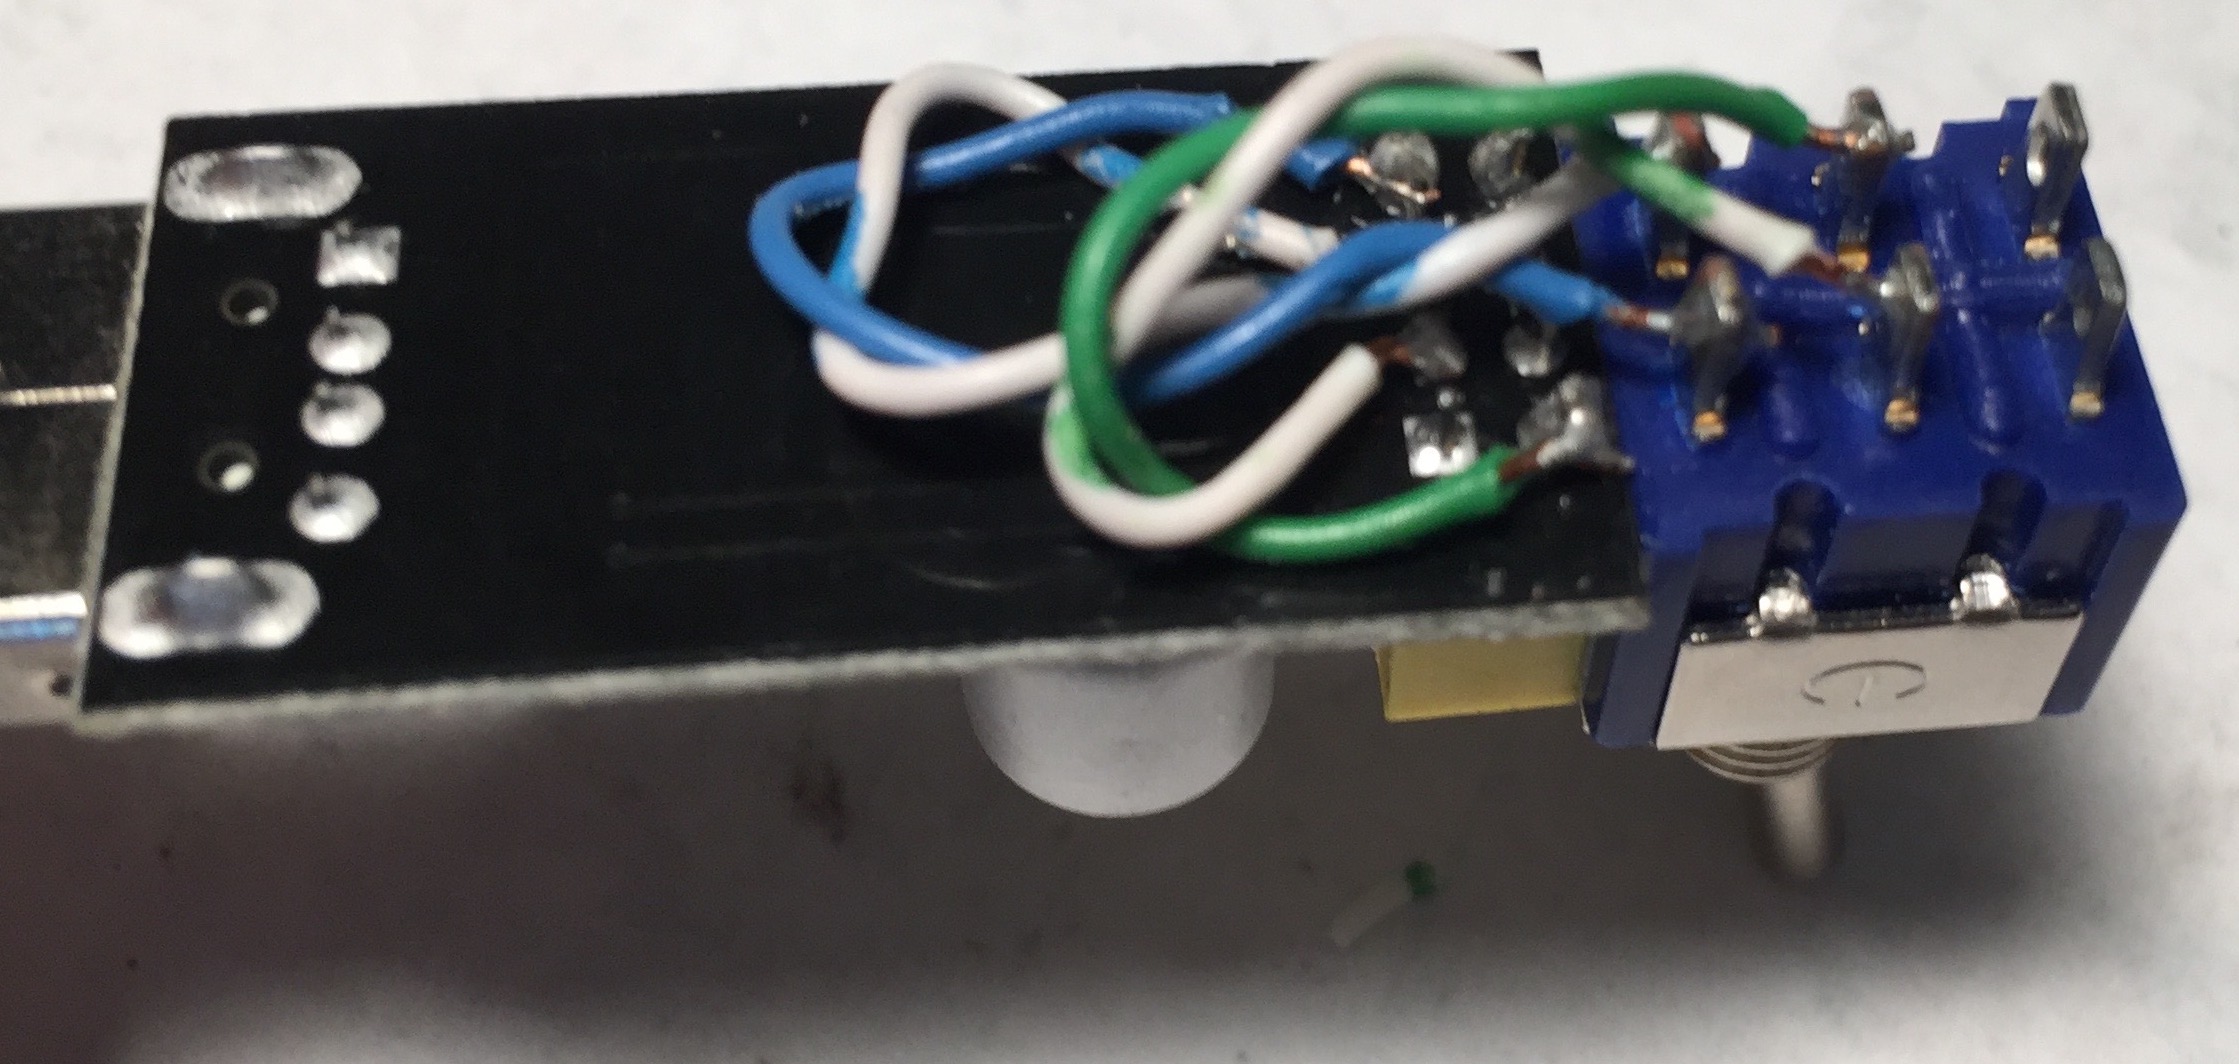
Now to flash some firmware on it and I decided right away to add a switch and break out the soldering iron and add one and super glue it to the end. I’m using old Cat5 cable solid core wires. It works perfectly and I was stoked.
Of course the firmware linked in that article doesn’t work for me and so I downloaded a bunch and even kicked off a cloud NodeMCU build. When I finally find an image that works I got a Lua command prompt. print("Hello World!") works!
There’s a whole bunch of choices about which languages you want to program this thing in, from the lowest level Arduino IDE C, to Lua, to Javascript to MicroPython. I chose Lua because I’ll be damned if I’m ever going to type malloc again, Javascript is Javascript and MicroPython seemed too unfinished and resource intensive. The NodeMCU project which uses Lua has great documentation and seemed to have access to all the APIs I was interested in.
I had planned to be clever and use a latching relay activated by a magnetic reed switch to power it so that it’s only drawing current when it’s working and then it’ll shut itself down so I order some relays and get ready to wait another month or two. A friend on a nerdy slack group I’m on drew out a version of a latching circuit which I was going to try for version 2 but I understandd relays and thought I could get this up and running with technology I actually understood first. Then I found out about the deep sleep functionality of it and found out my board didn’t support it because pin 8 wasn’t available on the header pins. I could get there by soldering a teeny wire onto the surface mount chip, but I didn’t want to go there. So I learned a bit more about it and found there were other versions of the 8266 chip boards and I had version 1 ESP-01 and there were others with more pins exposed. Some of them even supported an external antenna which would look neat on my mailbox, I had planned to just have this thing be in a little plastic box on the outside. Sure it was exposed and possibly stealable and it’d have my WiFi password on it if someone was really determined but it was a risk I was willing to take. I ordered some ESP-7 and ESP-12F and some antennas too, but I could still work with what I have to get things rolling.
Christ, this is too long and boring already. Sorry. Just give up. But Ian insisted I document it so here we go…
Then I found that article I link to at the start and find out that I don’t even need any of that latching nonsense or deep sleep pins and this board will just do what I want. Get some! No need for relays or latching circuits. It’ll just work so let’s build it!
It was at this point that PG&E Sucks so hard that they shut off the power to most of northern California and I’m reluctant to use my precious laptop battery power or my meagre cell phone data allowance. I also thought long and hard about setting up my Internet slightly interruptible power supply at this new house because now I didn’t have WiFi. Savage.
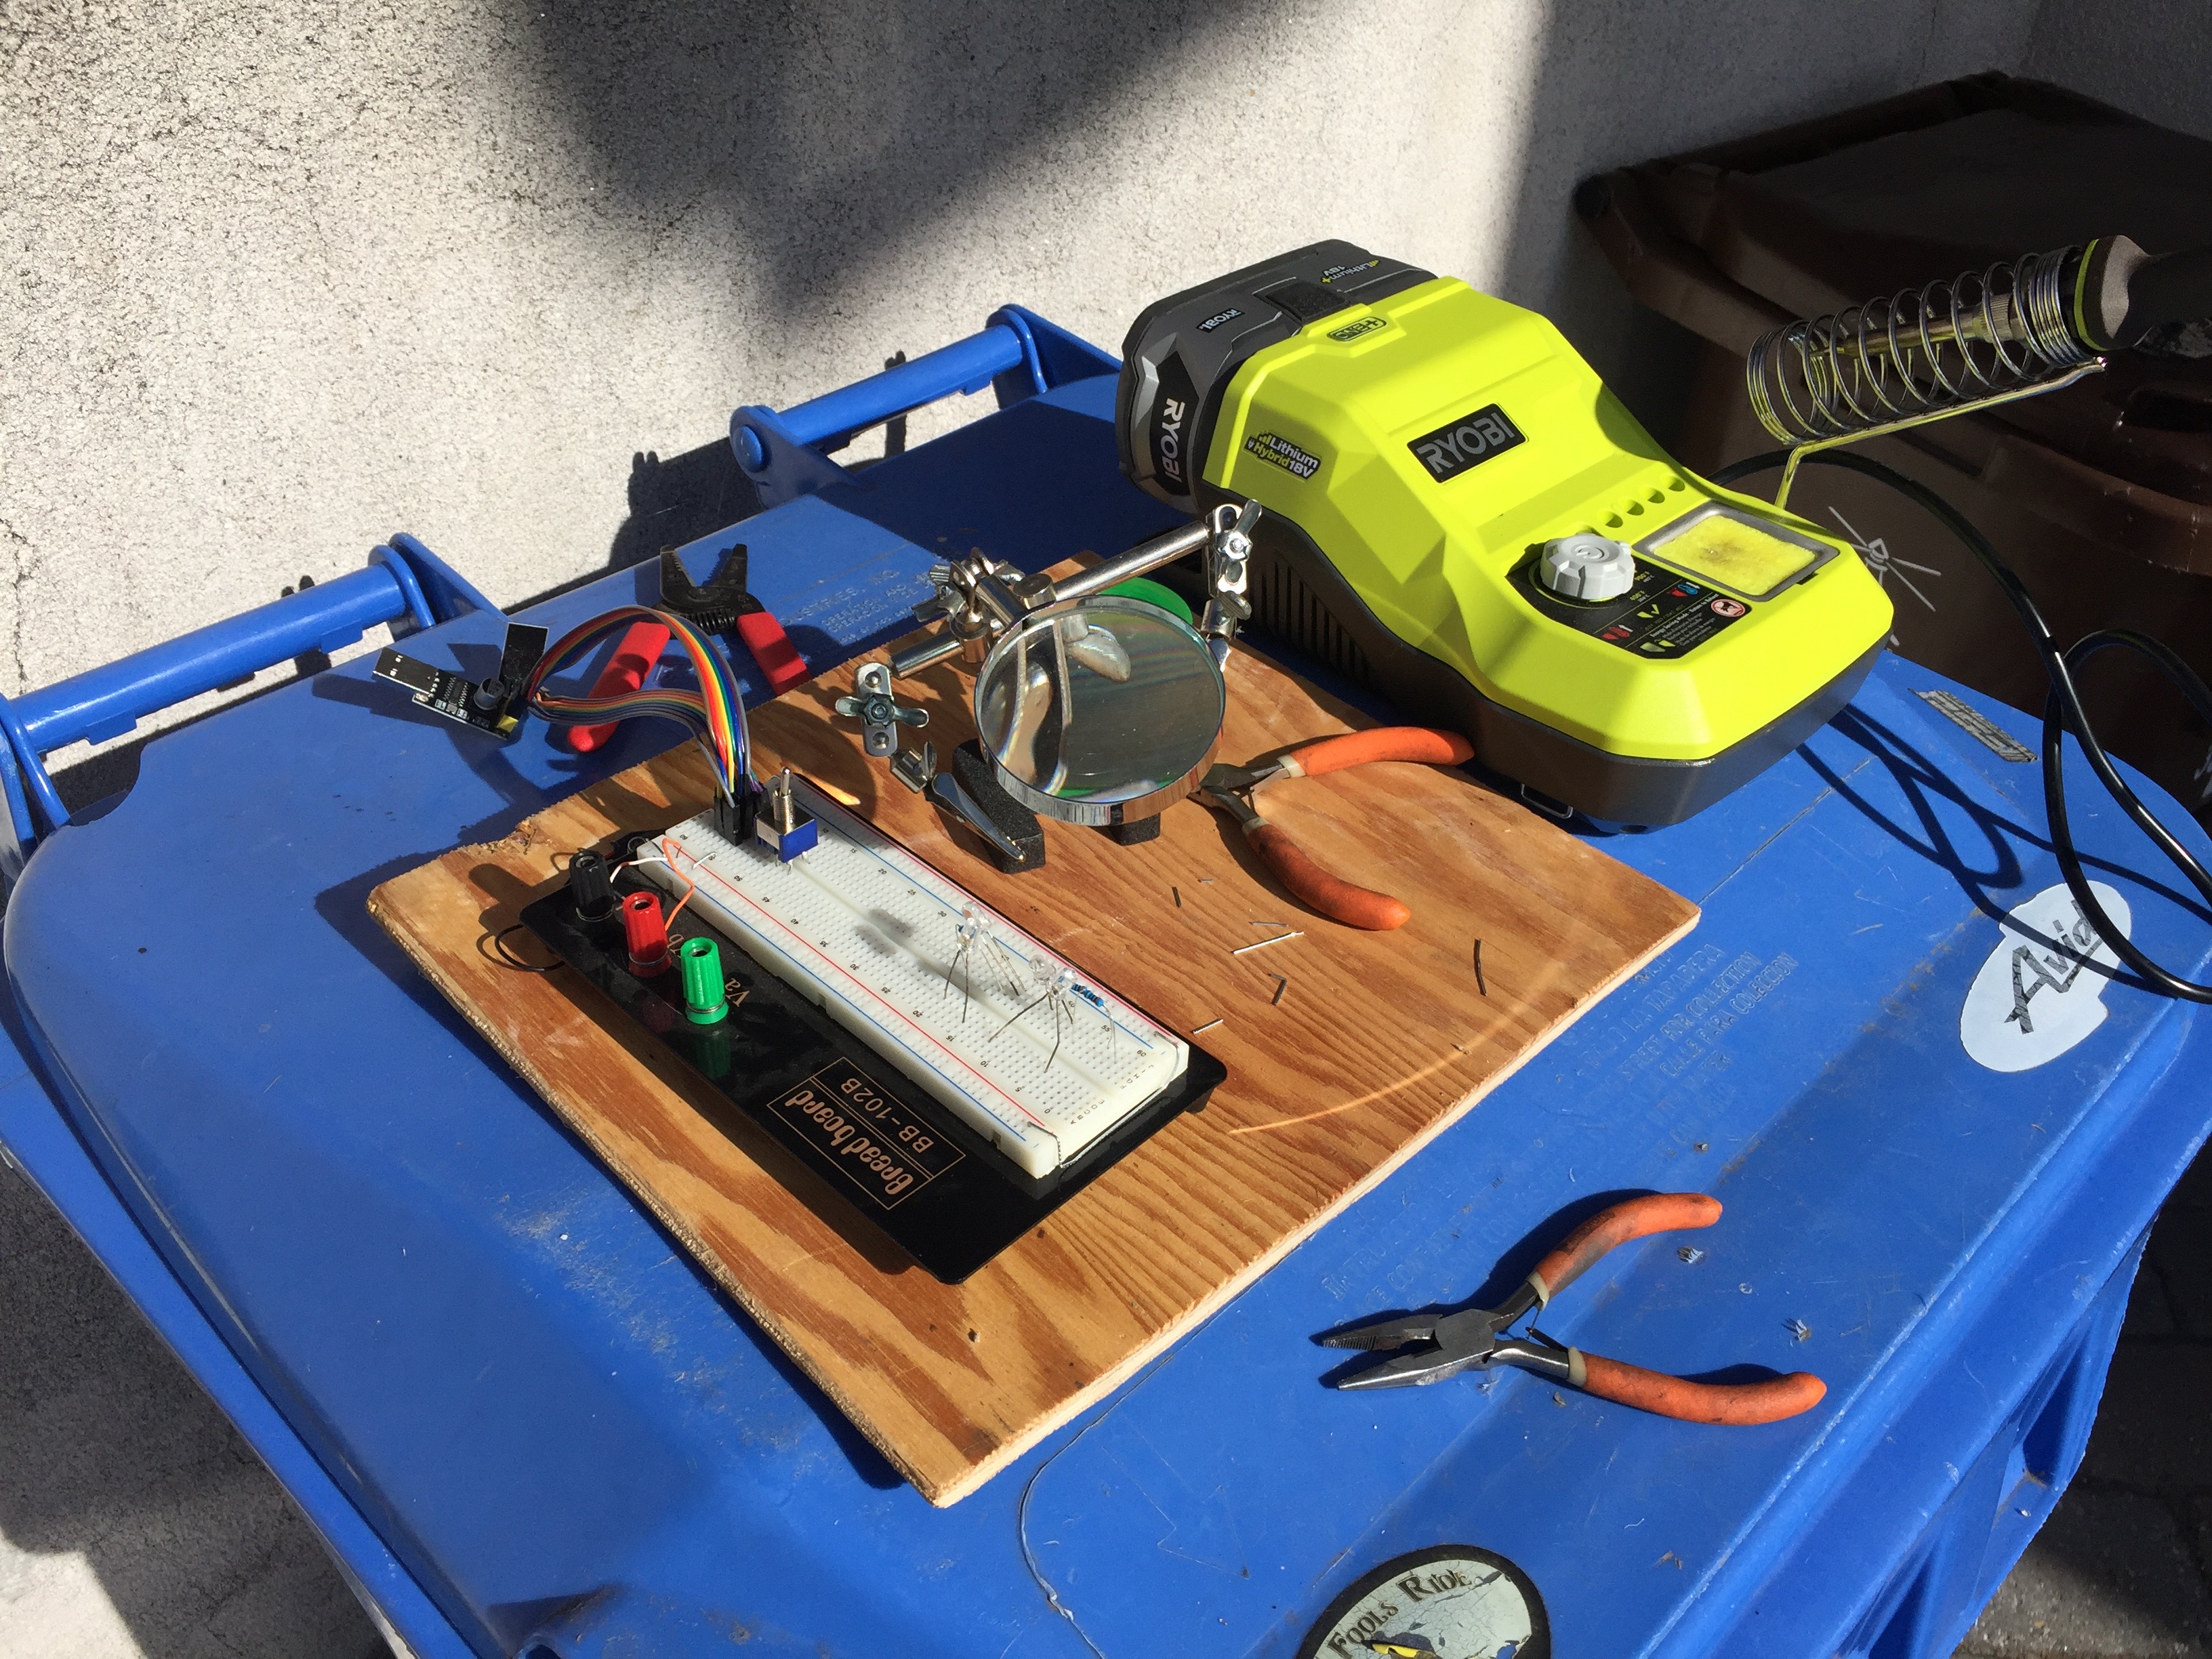
Building hardware
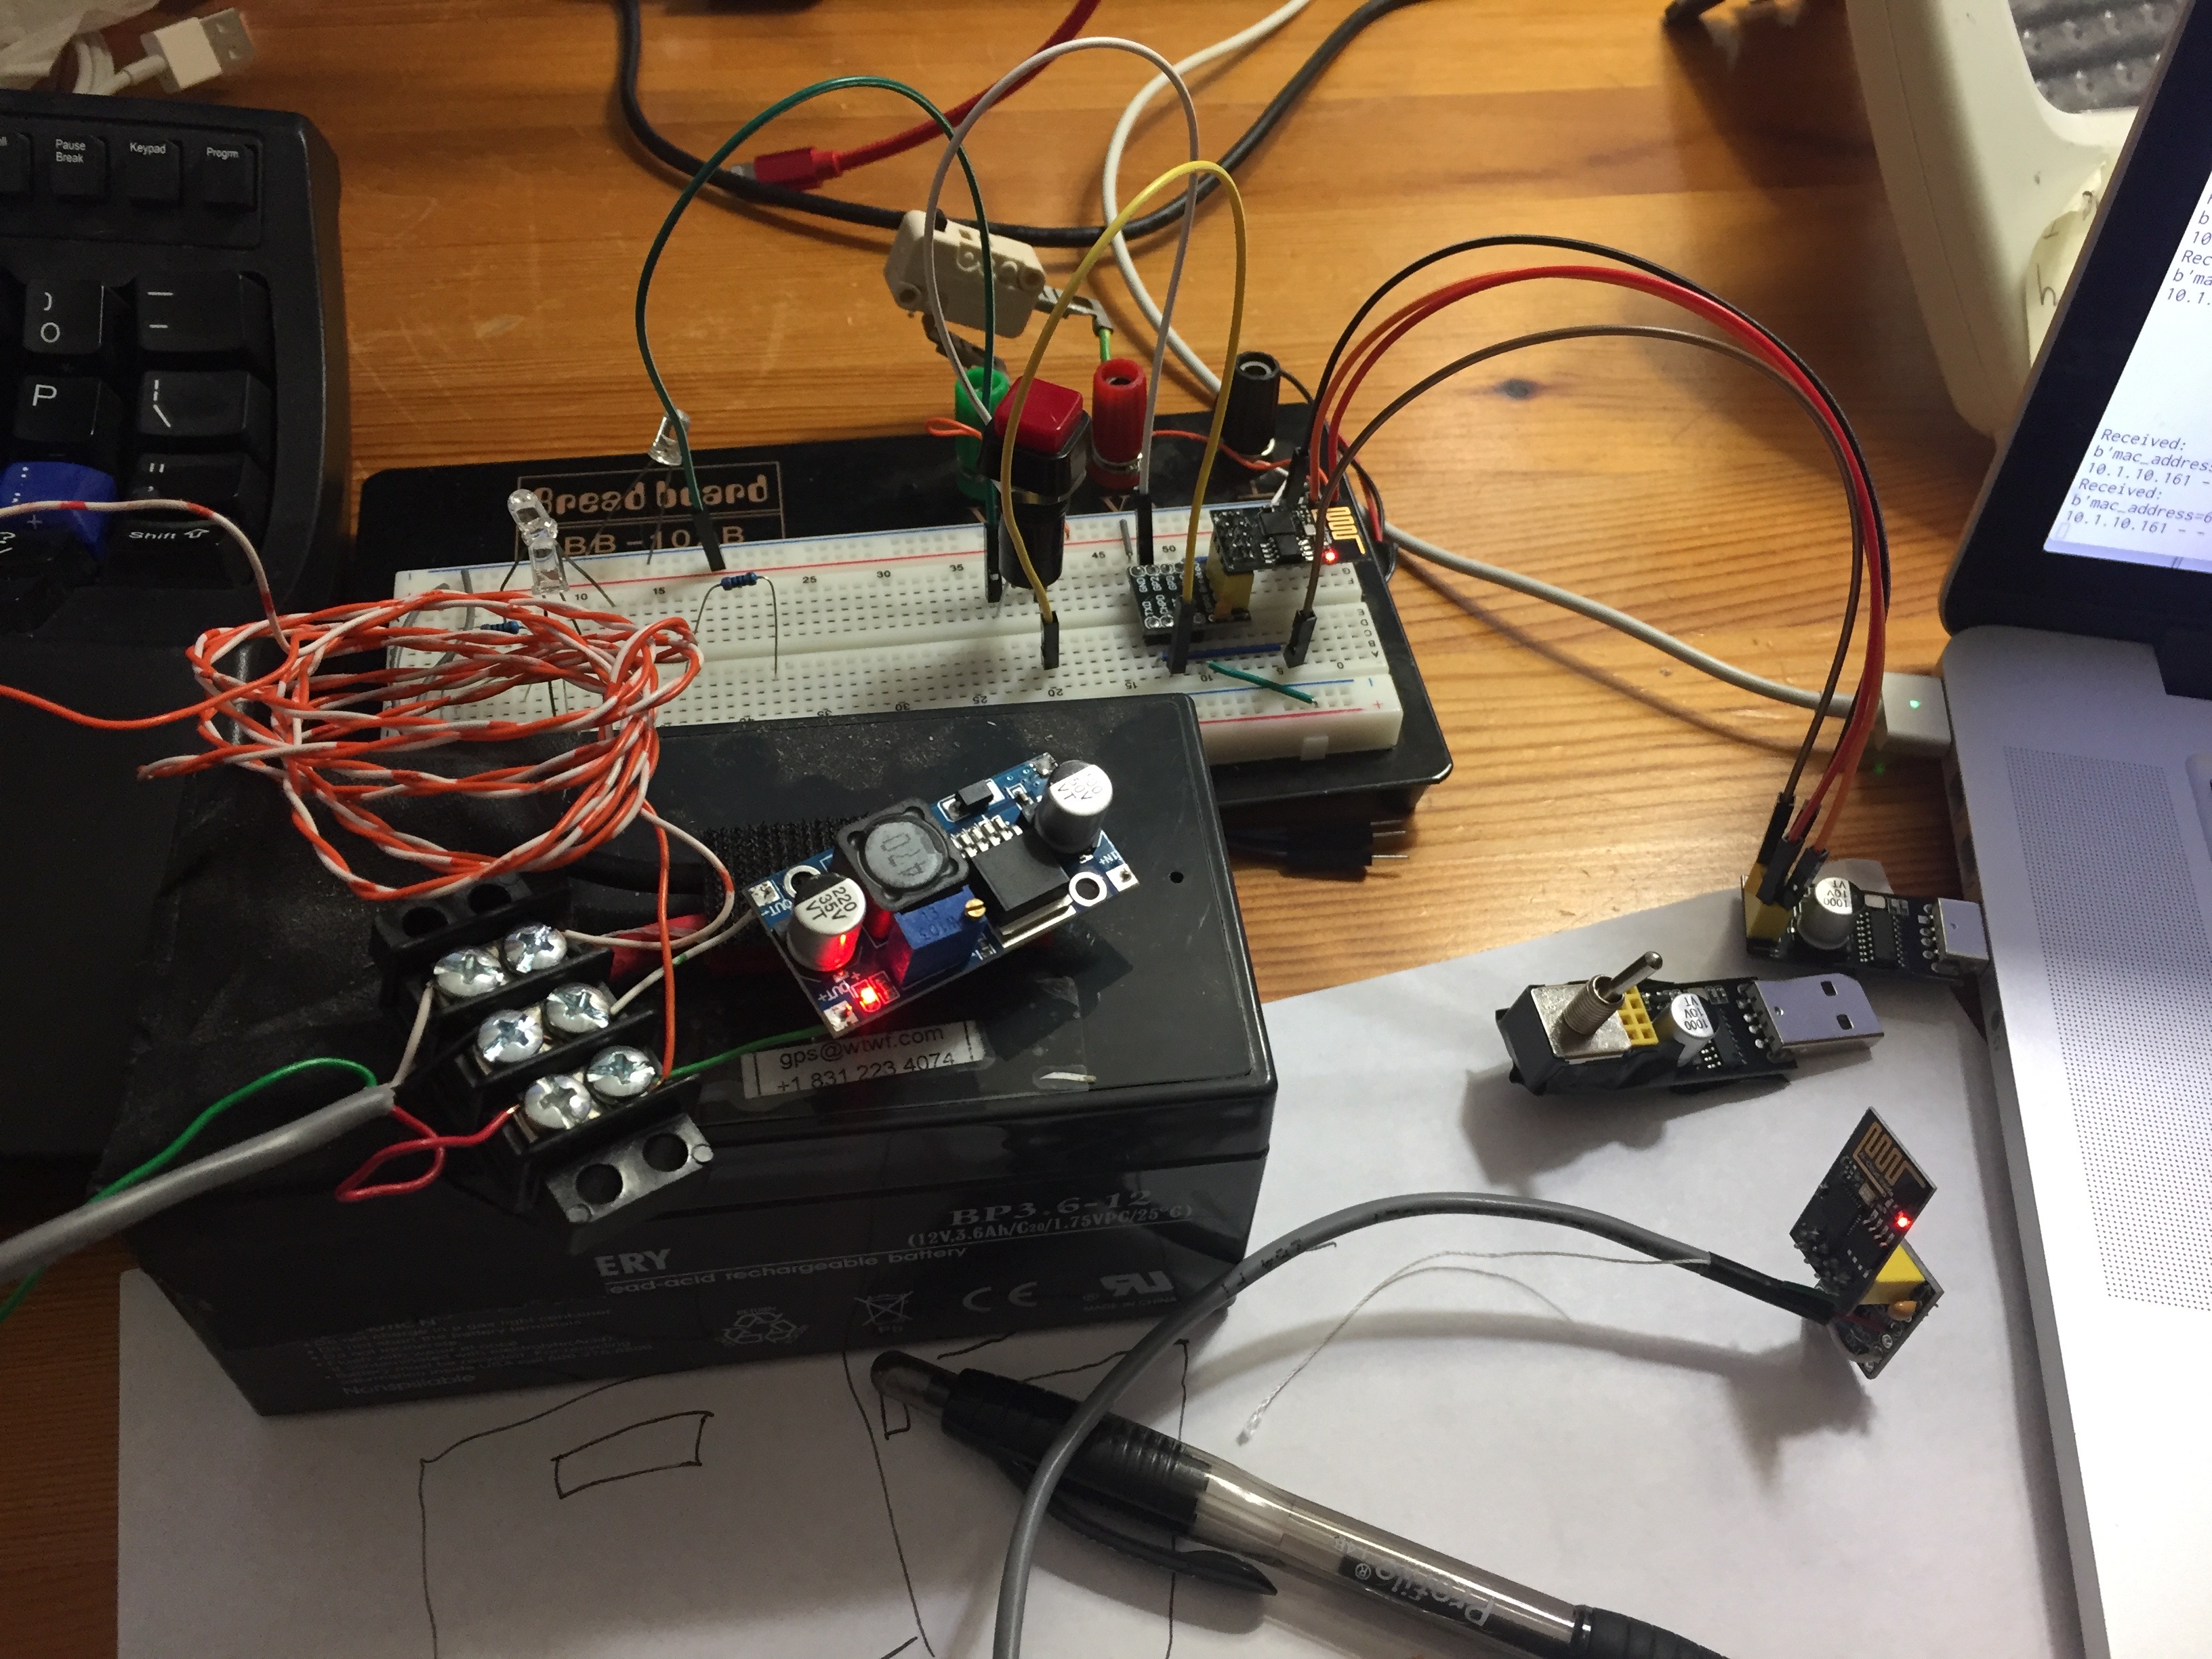
The garage was dark and so I worked outside on my recycling can. I really appreciated having my battery powered soldering iron, I love that thing, it works great. I breadborded up the circuit but didn’t power it up yet. I felt clever running the power and ground to both the top and bottom rails on the board allowing me to get to both from either side of the trough. Nice and tidy! I soldered paper clips to the legs of a DPDT switch and added a Normally Closed push button microswitch to momentarially remove power to the ESP01. I was pleased with the tidy stacked jumper wires to get all the pins from the USB serial port to the 8266 board.
Then I had a day at a water polo tournament where I leanred Lua during the breaks and skimmed the documentation for all the NodeMCU modules.
Finally we get power back and I plug it in and it doesn’t work. I am crestfallen. This is exactly why I haven’t done much hardware in the past.
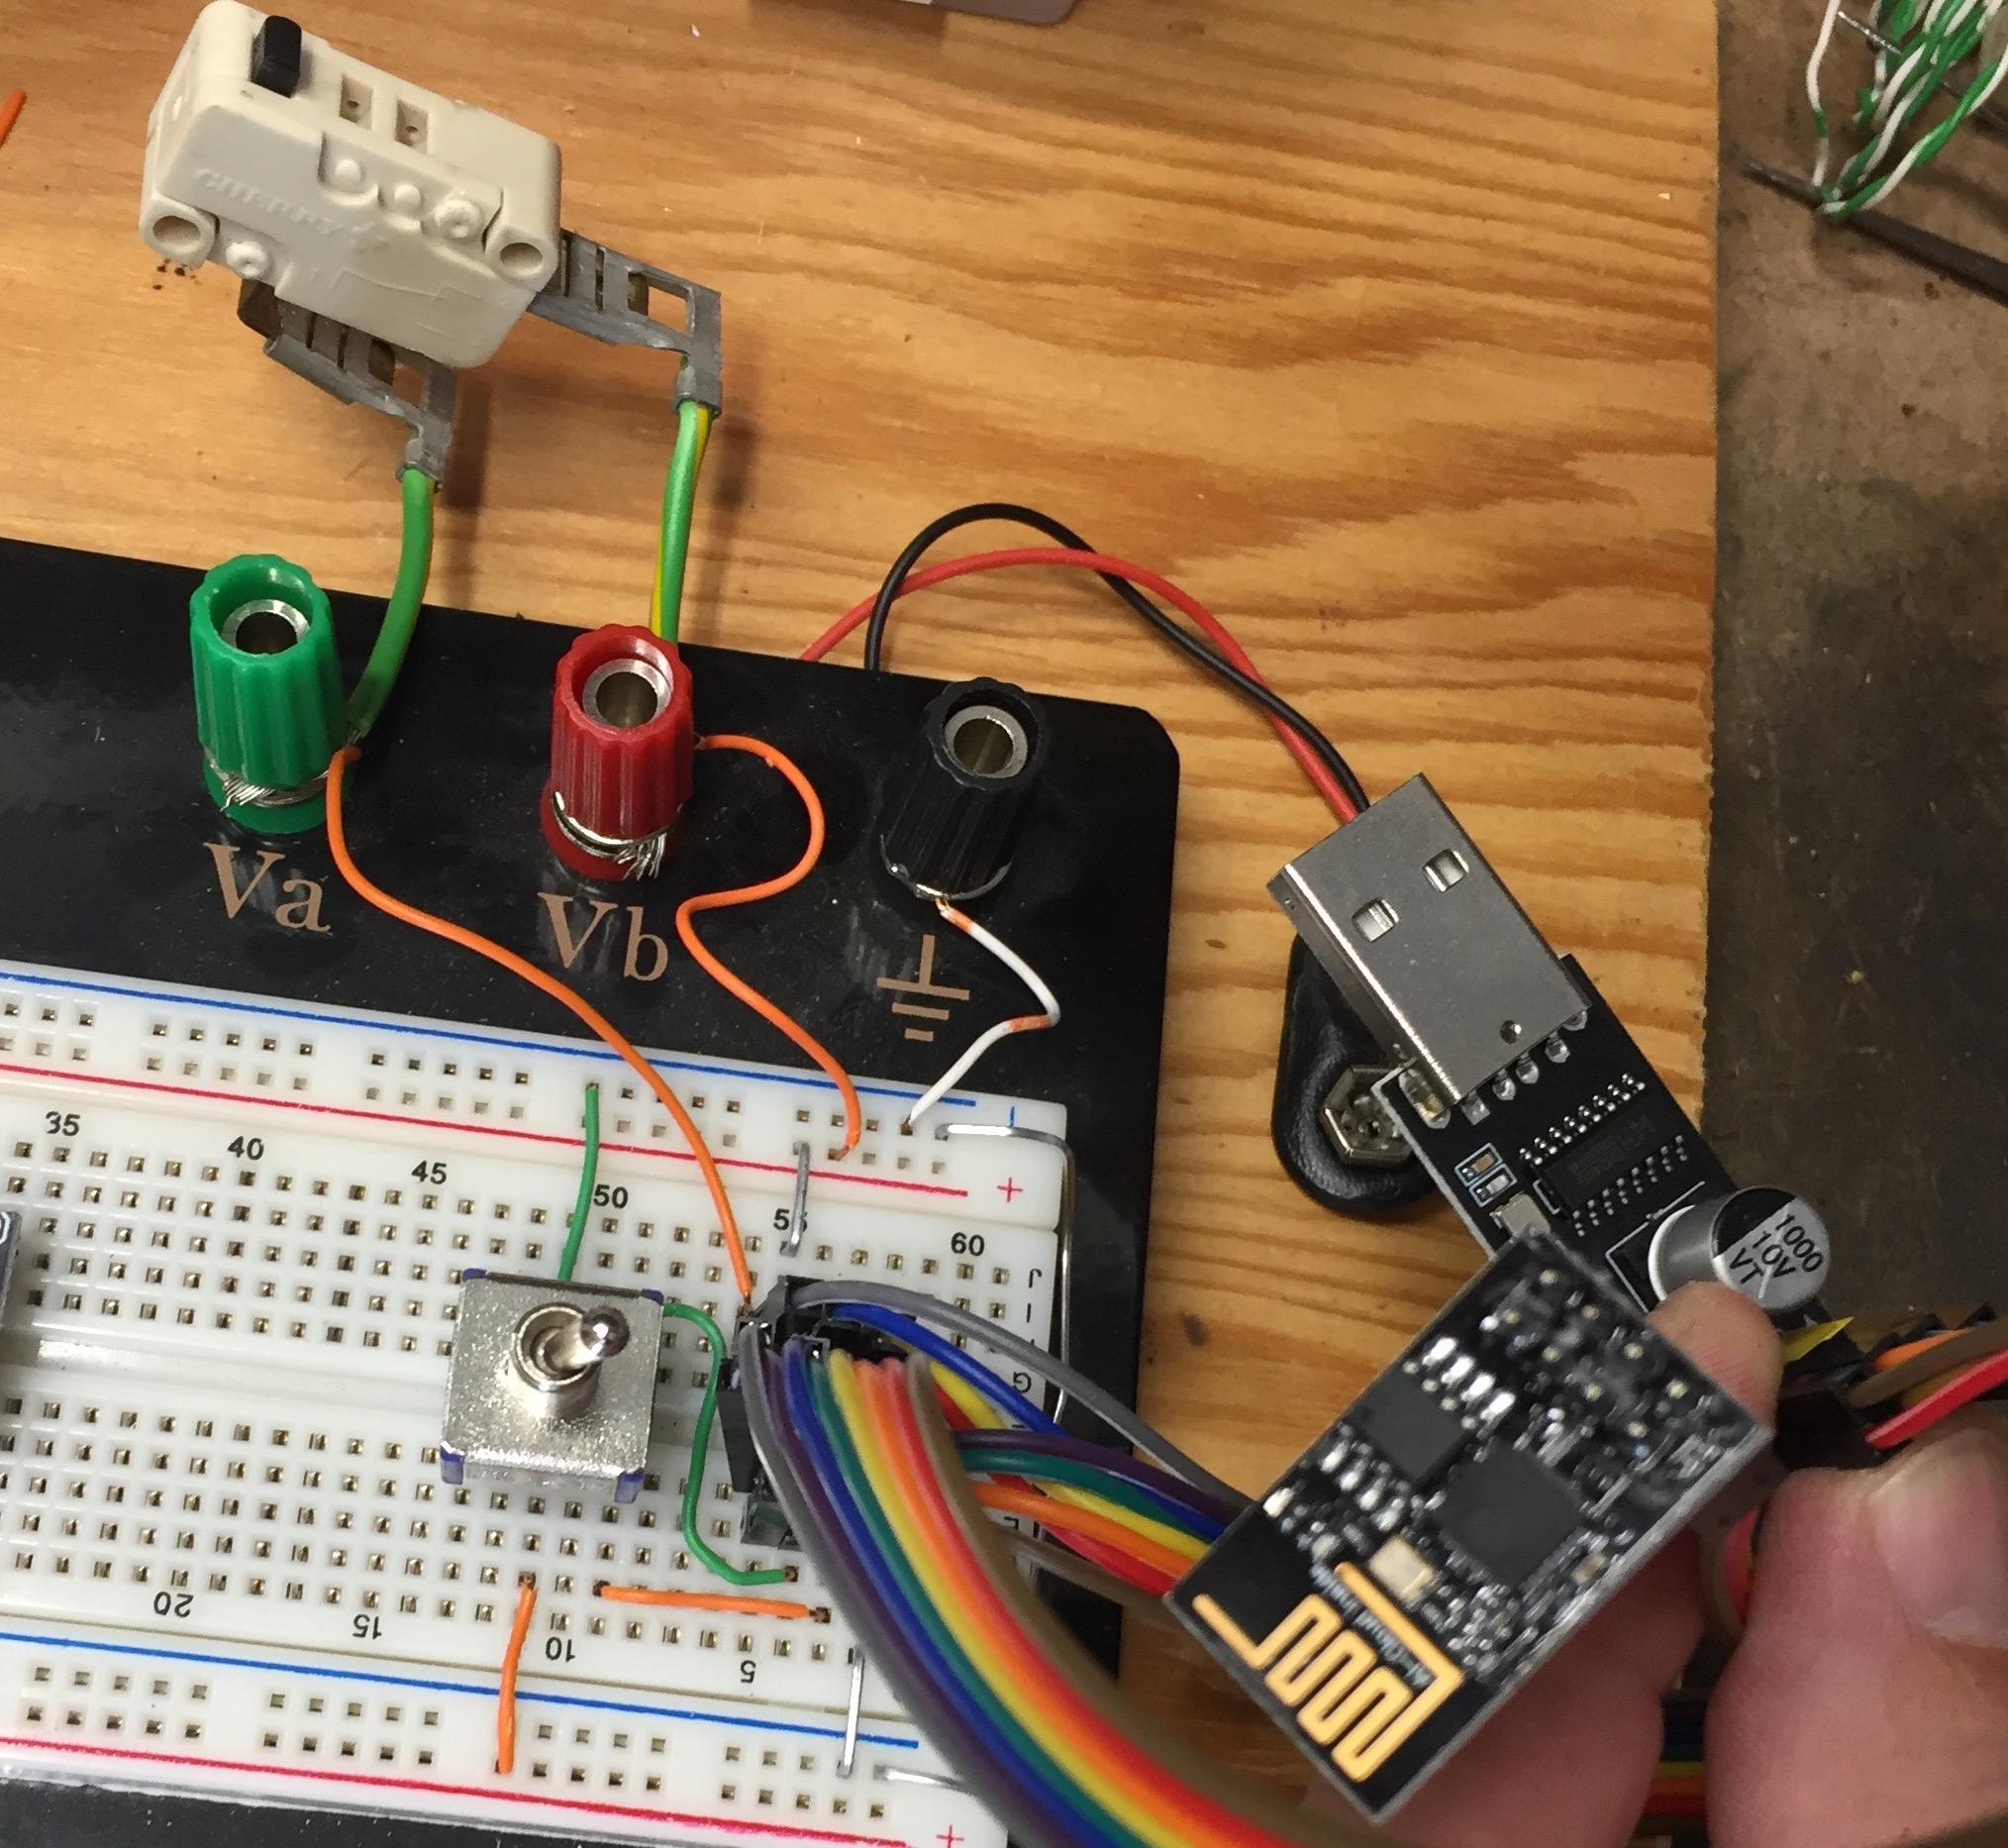
So I pull it all apart and solder pins onto the pinboard I got to eliminate at least one set of ribbon cables and get it to work. Turns out one of the power bus rails wasn’t connected all the way through, I’m not sure if this is standard with breadboard or not, or just mine. The red line is solid, but check out that teeny paper clip on the bottom red rail. Here’s the working version. I decided I’d just plug into my modified USB serial thing for flashing firmware and use this breadboard for testing the powerup with a button and shutdown itself stuff. It worked! It used .33 mA in standby then I removed the power led and got it down to .105mA and it used 80mA when using WiFi. A battery is going to last a really long time!

Source software
I had found this code and had a hard time understanding why they set the wifi password in init, and setwifi.lua never seemed like it would ever get called and indeed that’s exactly what happens. I went to the original article and saw the code it was slightly smarter but it was still prone to resetting at the slightest error, button pressed for too long (mailbox left open), or a dns outage. It was at this point I decided, let’s just get something working. I hacked in the wifi password. I spent a long time trying to work out why only one of my boards worked with wifi when I finally worked out you had to pass pwd= into wifi.sta.config() rather than password=. I also stripped out the IFTTT stuff and just had it ping my local python server I’d handle the IFTTT stuff later. Also I had the goal of playing a little chime over the airplay speakers in my house when mail was delivered and I couldn’t do that easily with IFTTT.
Well I got it to work and never managed to screw up init.lua which would have caused a boot loop. The only boot loops I had were in the files init.lua called after it got wifi (3-5 seconds after boot) so I could just run while true; do nodemcu-tool remove init.lua; done and it’d remove them. Sometimes I’d forget I had to push the button to power up the ESP-01. I added code to prevent boot loops. By pulling GPIO low it wouldn’t do anything.
I had a hard time with the airplay speaker idea. say will allow you to choose an output sound device but the mac needs to have that selected as the output and you can’t select more than one. afplay won’t let you choose an output device. To choose a voice for say I did this to try all of them for fil in $(say -v ? | cut -c 1-8 ); do echo $fil; say -v $fil "You've got mail"; sleep 1; done which was interesting to listen to
Turns out my wife hated the idea of sounds playing in the house and it unnerved the cats too even though we play music all the time. If I had to do it I guess I’d be controlling iTunes with applecsript (probably in Ruby via rb-scpt)
Development environment and code
I set up Emacs to use luacheck via flycheck. Getting luacheck was a little annoying. You need to brew install luarocks then luarocks install luacheck and I found out that the original author had passed away, which is why I link to the luarocks GitHub repository. Usually I make emacs format code on save and I looked at a few, but wasn’t super impressed. I have lua-fmt installed but I’m not in love with it.
All the code’s based of the IFTT Smart Button article listed at the top of the page.
Makefile
I’m particularly proud of the this. I ditched CoolTerm and used rlwrap and the nodemcu-tool terminal which gives me command history and editing (it’s sent to the serial port when you hit enter).
I also have a .changed directory that has timestamps of the last time the files were uploaded to the device. This way you save a file. run make and it only copies the files that changed. Plug in a new ESP8266 and you just make clean and it’ll upload everything again
make wifi will install and run the wifi setup file. I didn’t check that file in but it basically does a
node.restore()
adc.force_init_mode(adc.INIT_VDD33)
wifi.setmode(wifi.STATION)
wifi.sta.config({ssid="<YOUR SSID>", pwd="<YOUR WIFI PASSWORD>"})
init.lua
I made this as simple as possible to prevent boot loops. I also don’t call ping.lua if you pull GPIO0 high
ping.lua
This connects to the wifi, opens a specific IP address on port 8080 and issues a POST request. I send the mac address of the ESP01 and also the current battery level. Then I shutdown the ESP01 if the connection works or fails.
ark-uri.lua
A utility method to url ecode a lua table.
server.py
This is running on my mac inside the house. it reads .ifttt.key which has my webhook key in it.
Installation
Eventually I’ll use a small 18650 battery to power this, but while that’s shipping I’m using this huge honkin old UPS SLA battery and a variable DC2DC voltage board to get 3.3V out.
Well the reed switches I had ordered almost a year ago were “Normally Closed” and for my design I wanted “Normally Open” so I spent more than I should have on these.
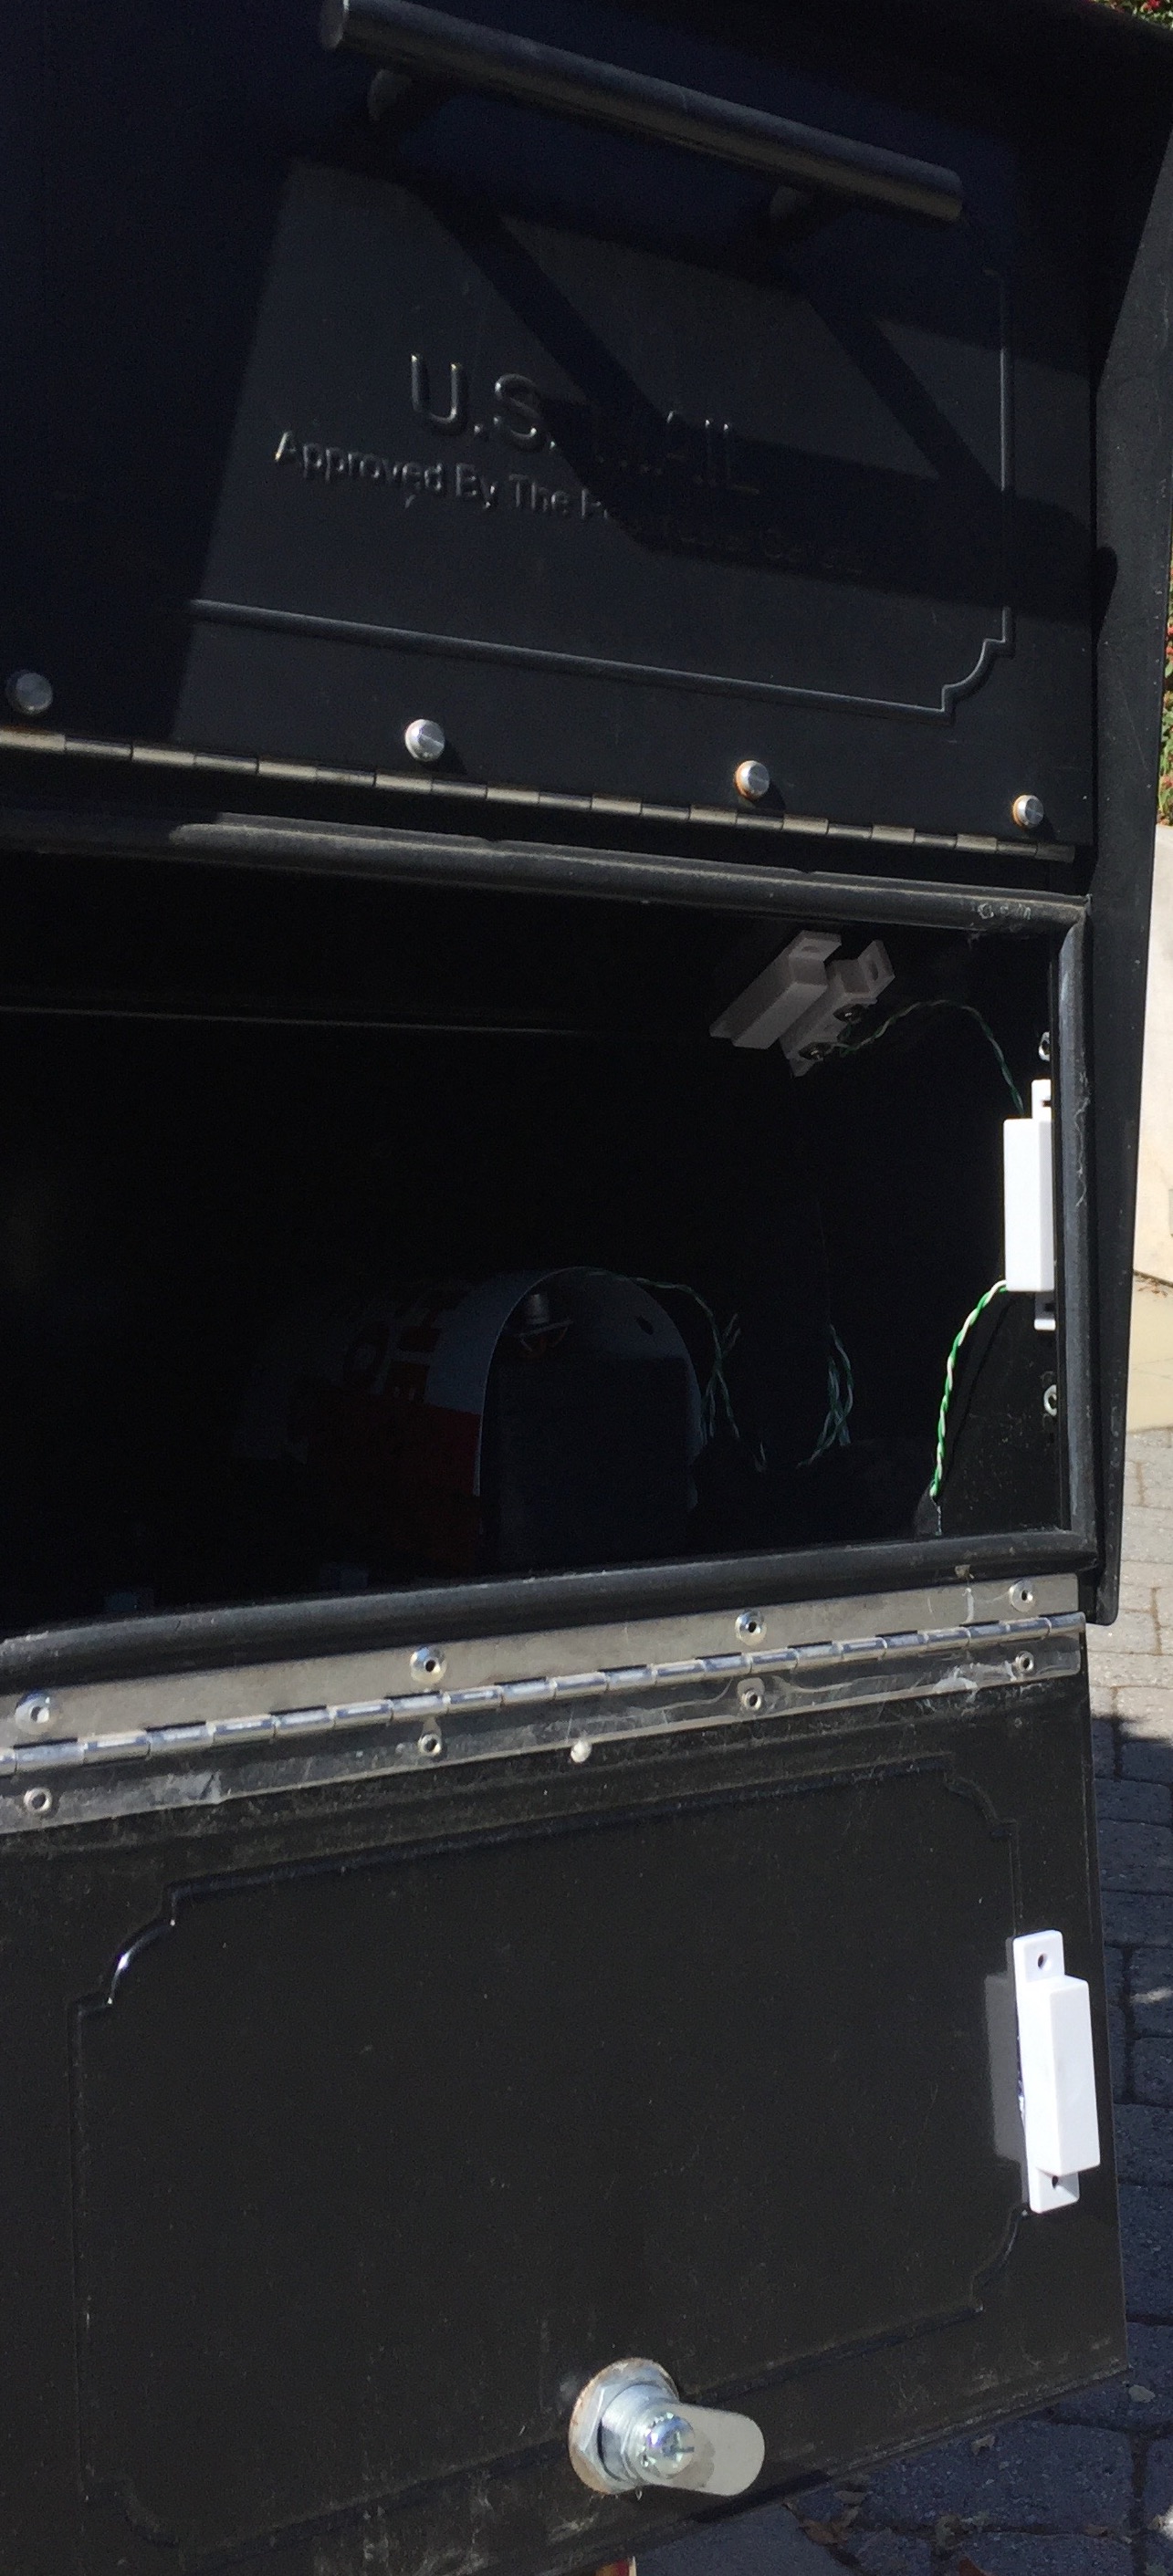
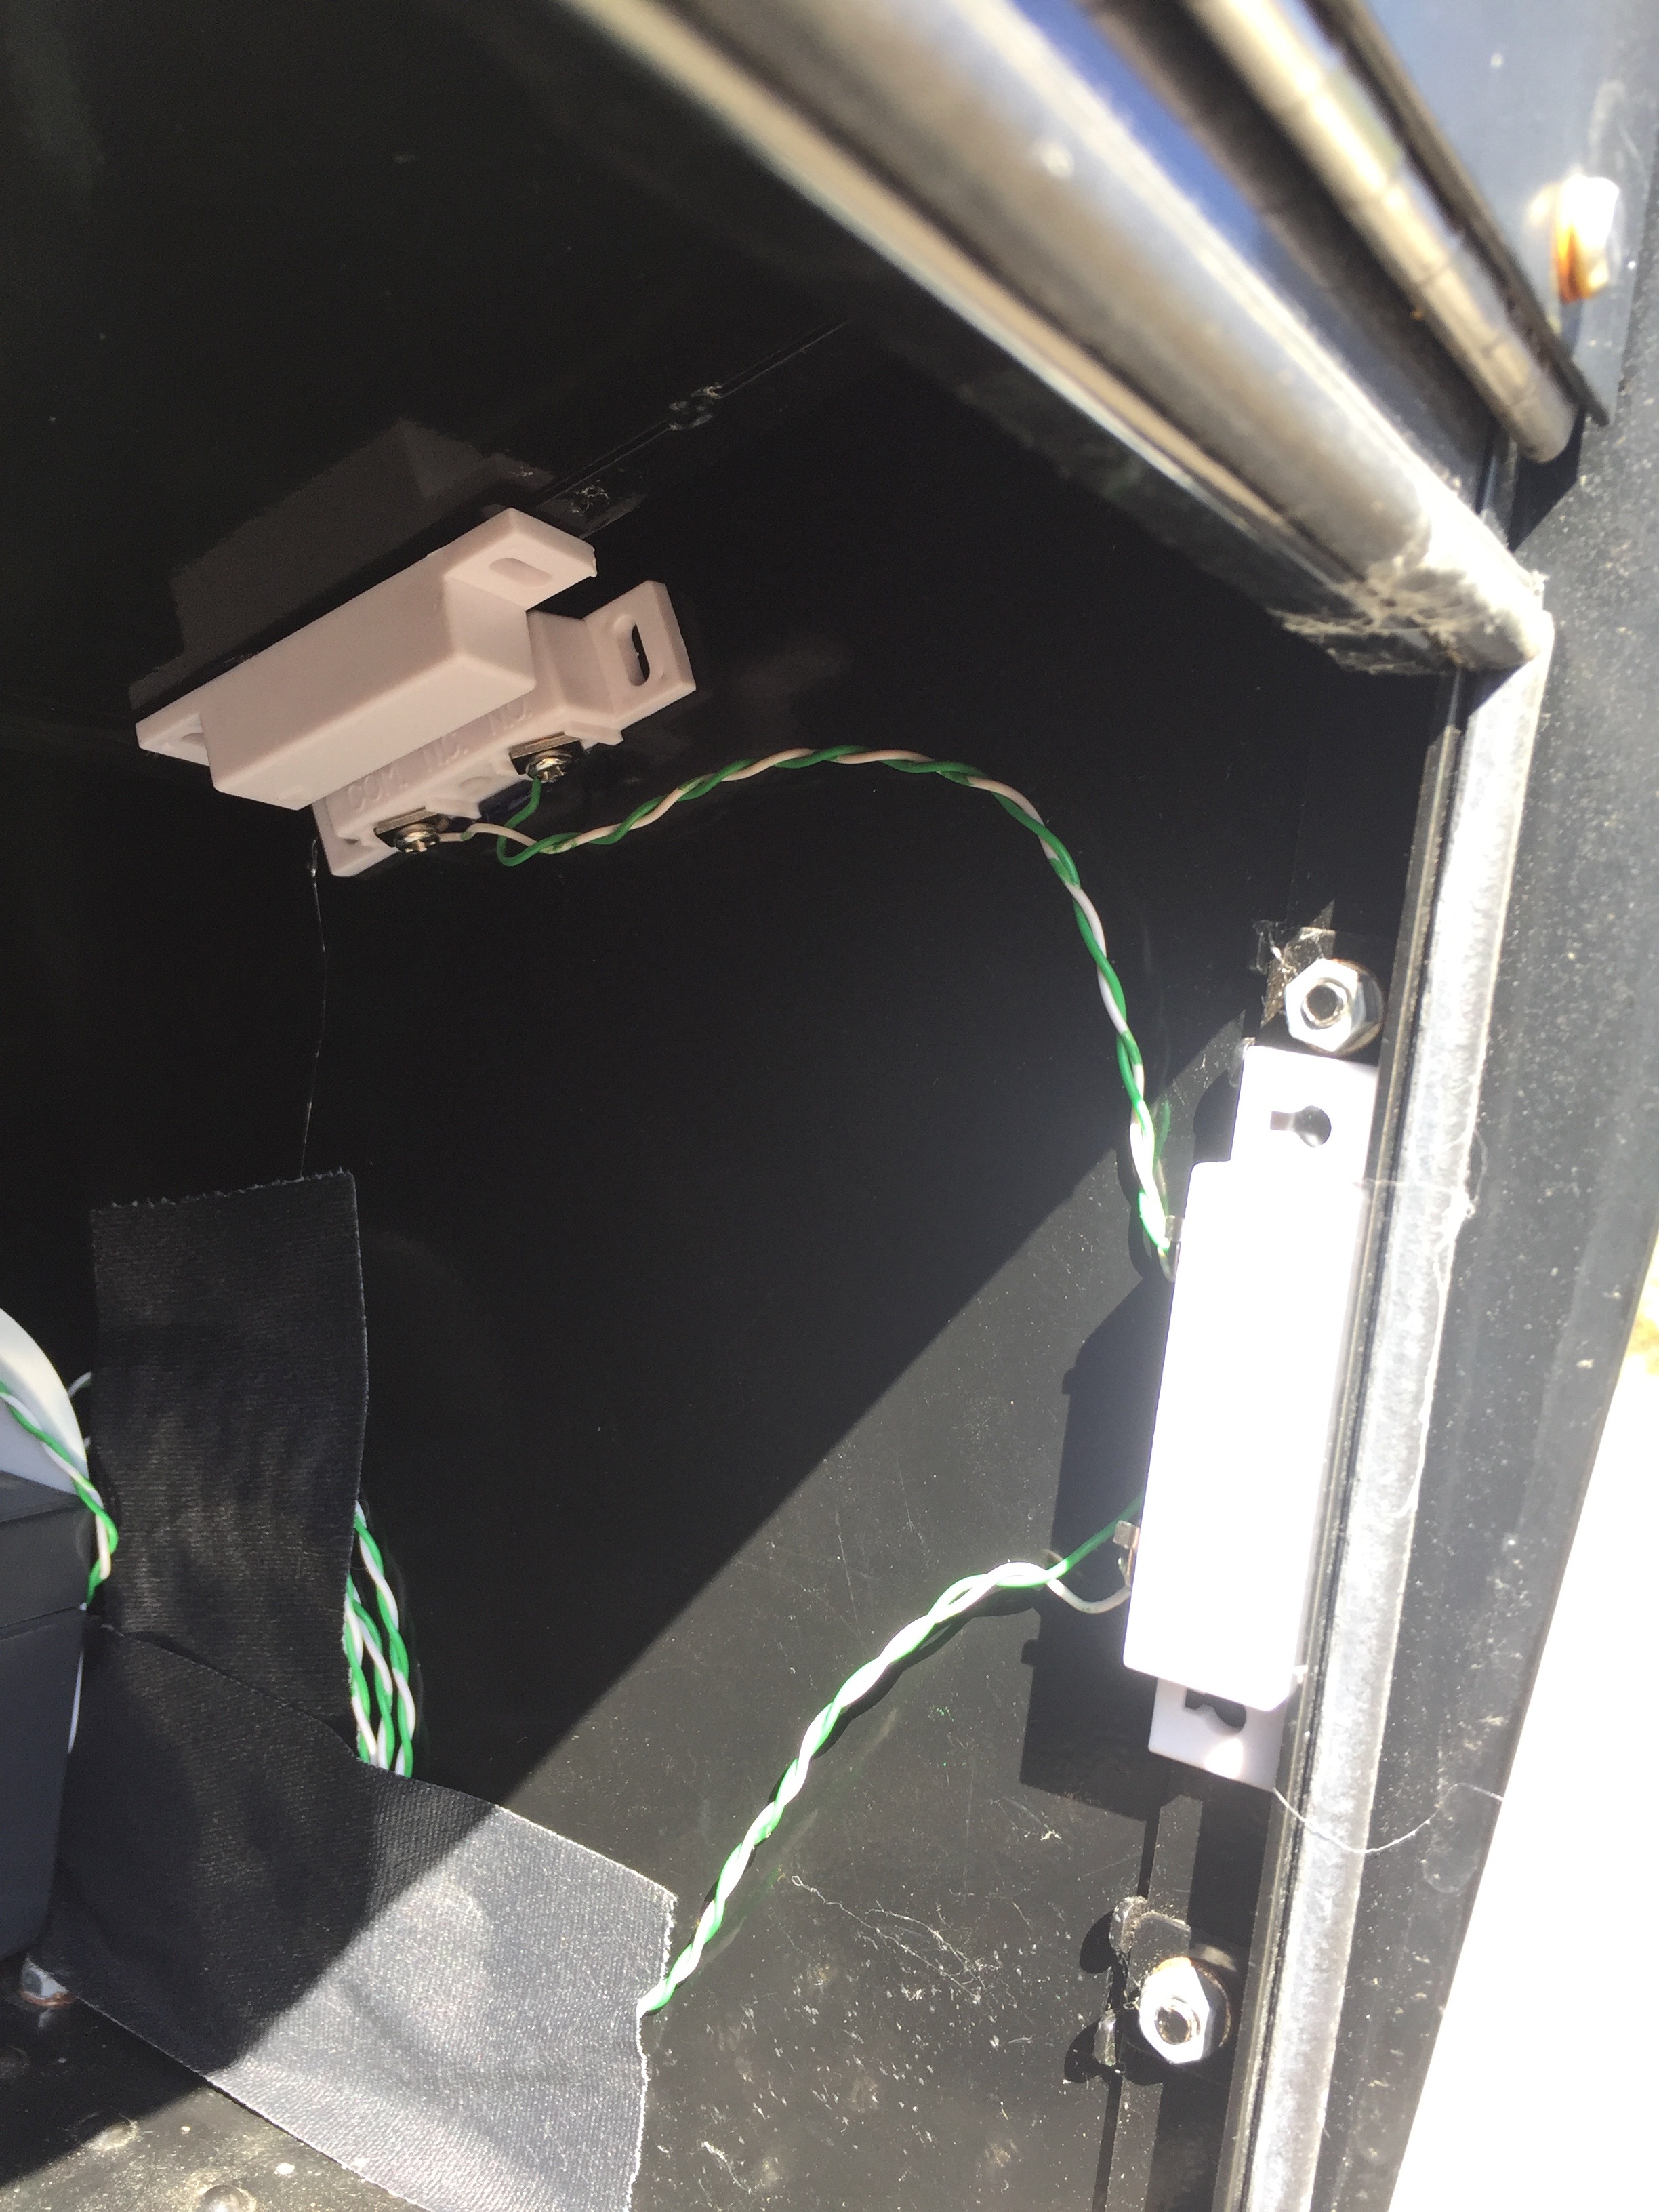
I have two reed switches so that when I’m checking the mail by unlocking the bottom part, opening the top part to see if any mail is still in there doesn’t send an alert. The switches are in series and the bottom one is normally closed and the top one normally open. The bottom door needs to be closed and the top door open for the ESP01 to power up. My battery powered gluegun was pretty useful here.
I was pretty pleased with myself at this point and it was working well. Until I went to show it to the family and then nothing worked. Seems the wifi signal is just a little bit too weak down at the mailbox. So I enabled wifi on an airport express which is closer and that didn’t super work. So I put the ESP01 on the end of a really long piece of cat5 cable and ran it up the driveway a bit. It’s less than ideal, but hopefully the ESP07 and antenna will get a nice strong signal. Of course the long wire had some voltage drop so I had to bump up the voltage on the DC2DC unit so it was 3.3v at the ESP01 end.
Setting up IFTTT was sorta easy, I find the UI very confusing, but finally got a webhook and a phone app notification working.
Here’s the end result:

Shopping list
This was my first project so I didn’t have a lot of things I needed. I made do with what I had, but also have a lot more coming. Since most of this stuff is coming from China and is so crazy cheap I erred on the side of ordering more than I need. So here’s a list of stuff I bought recently, you might want to buy some of it too.
Stuff to get this project working:
- ESP-01 and USB serial port/programmer
- ESP-01 pinboard
- 18650 batteries
- battery holder
- magnetic sensor switch
- MCP1700-3302E 3.3V LDO Voltage Regulator
- resistors
- diodes
- jumper wires
- breadboard
- DPDT Switch
Other stuff you might want:
- Micro USB pinboard
- ESP-07 and ESP-12F
- ESP-07 pinboard
- Antenna
- ESP-12F
- 1.3” OLED screen with buttons
- screw terminal
- wire connectors
- pin headers
- Accelerometer
- multimeter probes
- push buttons
- wired connectors
- power module
- ESP-01 LED module
- LED Strips
- ESP32 with Display
- Camera
- OLED screen
- 5V LDO Voltage Regulator
- Single CR2032 battery holder
- Double CR2032 battery holder
- Servos
- Transistors
- Diodes
Amazingly enough I already had capacitors and resistors.
Future ideas
I’ve already got a lot of ideas on how to improve this. Expect a v2 post soon with these in it. I wanted to get this documented first, but I’ve been itching to get this stuff written.
- use http library
- reset button,
- starts http server to update config with a UI
- hold longer to reset wifi which will then use enduser setup
- starts http server to update config with a UI
- choice of one or more actions
- ping ifttt directly
- ping server
- MQTT pings
- submit config to server for remote updates
- Ring Chime api (I’m not going to do this, but you might?)
Future Projects
- Motion sensor to detect packages delivered to my front door. I’ll use this guide but bypass the voltage regulator on that board so the PIR can be powered with the same 3.3V as the ESP. this’ll be able to be powered by a USB charger which will simplify things.
- Laundry monitor. From this inspiration article I learned about Node Red and MQTT protocol
- Gate monitor with camera - take a picture when the gate is opened.
notes
while writing this blog post I found this useful
for fil in IMG_11*; do magick $fil -resize 400 ${fil/./.sml.}; done
to make small versions of the images. Click the images to see the high resolution version.
I also came up with these new copy clipper rules to make nice small urls from long ones copied from the websites. Copy Clipper is one of my favorite things I wrote.
!^(https://www.aliexpress.com/item).*(/\d+\.html)\?.*!$1$2!
!^(https://www.ebay.com/itm).*(/\d+)\?.*!$1/_$2!
!^(https://www.homedepot.com/p).*(/\d+)(\?.*)?!$1/_$2!